
 03-27-2013, 06:05 AM
|
#26 | |
|
Goats on the Roof!
Join Date: Sep 2012
Posts: 62
|
Quote:
|
|

|

|
|
03-29-2013, 12:13 AM
|
#27 |
|
Ready to Wheel!!!!!!!

Join Date: Jul 2009
Location: Stanton, KY
Posts: 263
|
That was for you, the truck went from street to hard C.O.R.E. in a flash!
Where is that majic dust at?
__________________
1994 Dodge Ram 5.9L SWB 3/4 axles, 39.5 IROKS, HYDRO assist |
|
|
|
|
03-29-2013, 12:20 AM
|
#28 |
|
Ready to Wheel!!!!!!!
Join Date: Jul 2009
Location: Stanton, KY
Posts: 263
|
Correction, it appears to be the wrong truck. Just noticed Krawler's sig pic..
Need updates,,,,
__________________
1994 Dodge Ram 5.9L SWB 3/4 axles, 39.5 IROKS, HYDRO assist |
|
|
|
|
03-29-2013, 06:26 AM
|
#29 | |
|
Goats on the Roof!
Join Date: Sep 2012
Posts: 62
|
Quote:
|
|
|
|
|
|
03-29-2013, 07:35 AM
|
#30 |
|
Goats on the Roof!
Join Date: Sep 2012
Posts: 62
|
Are these worth it?

|
|
|
|
|
03-29-2013, 09:01 AM
|
#31 |

Join Date: May 2008
Location: Waverly ohio
Posts: 586
|
longfield has great rep. so i sure they are, and they cheaper then superjoints or nitros. they redid them also so only got 1 fitting instead 4 to grease.
__________________
SMITH BUILT PERIOD |
|
|
|
|
03-29-2013, 12:39 PM
|
#32 | ||
|
>>>PMC<<<
- CORE Member -
- Administrator - 
|
Quote:
Quote:
|
||
|
|
|
|
04-19-2013, 07:20 AM
|
#33 |
|
Goats on the Roof!
Join Date: Sep 2012
Posts: 62
|
Well, I met up with Scott and Rob, and they are some good dudes. The red Jeep is badass too. Scott said the caliper brackets are done! Cant wait to pick them up. Instead of opening the bore on the bracket, he decided it would be better to turn down the spindle such that it'll fit nice'n'snug into the caliper bracket. So
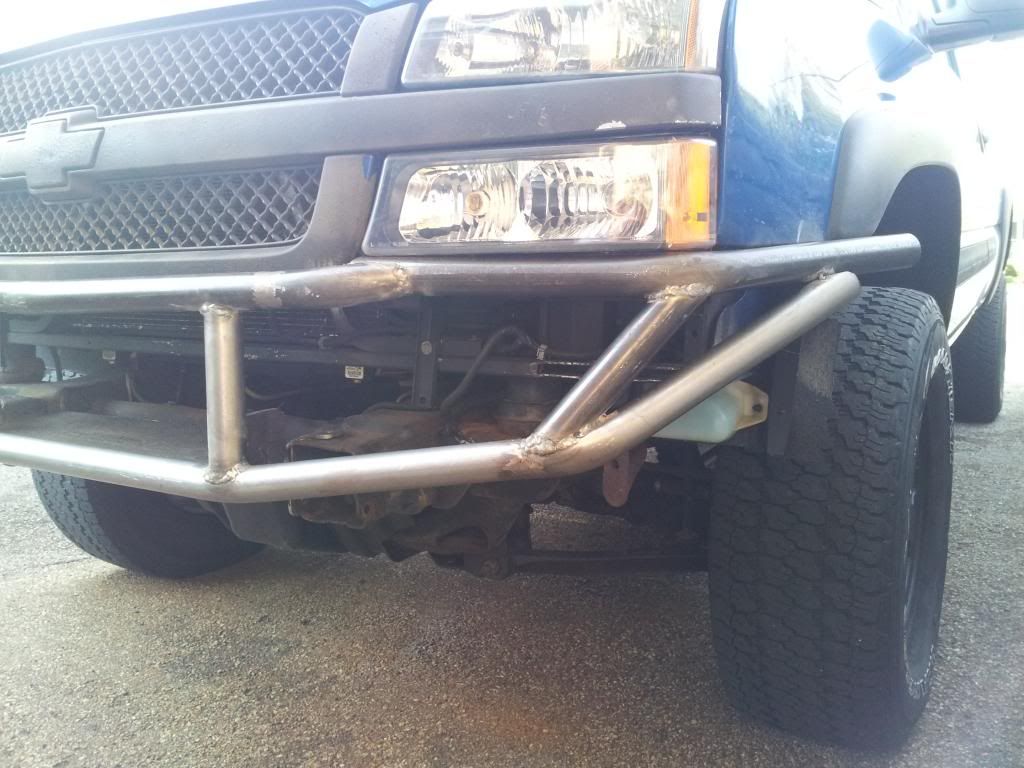
 for those guys. for those guys.I do have a question though... Is this the right PN for a Detroit? 225SL29A I'm getting pretty close to finishing the bumper. After many grinding and checking attempts, I was finally able to get all the tubes to fit. They are currently just tack'd together. I need to add the inner 'webbing' pieces, so that'll be another 500x grind/check session. I'm sure using a hole saw+vise is easier, but this is the first time for me, so, so be it. Also, parts are rollin' in, hooray for tax time. I'm waiting on Ruffstuff heims. Next to purchase is a master rebuild kit from a friend in C-bus, gears, and the Detroit. 4wd factory has an April sale going on now too. I could get that thing for cheap right now. Well cheap in the 'offroad' world. 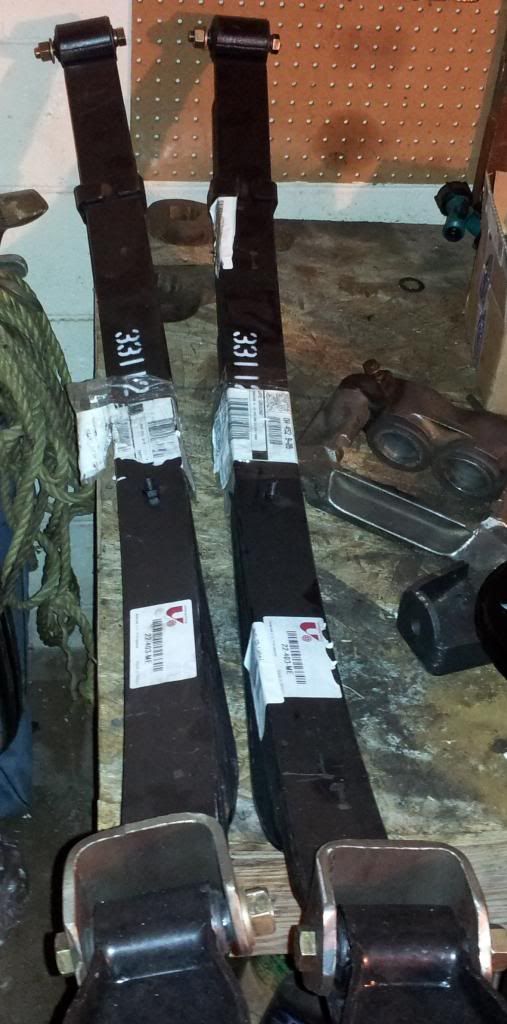 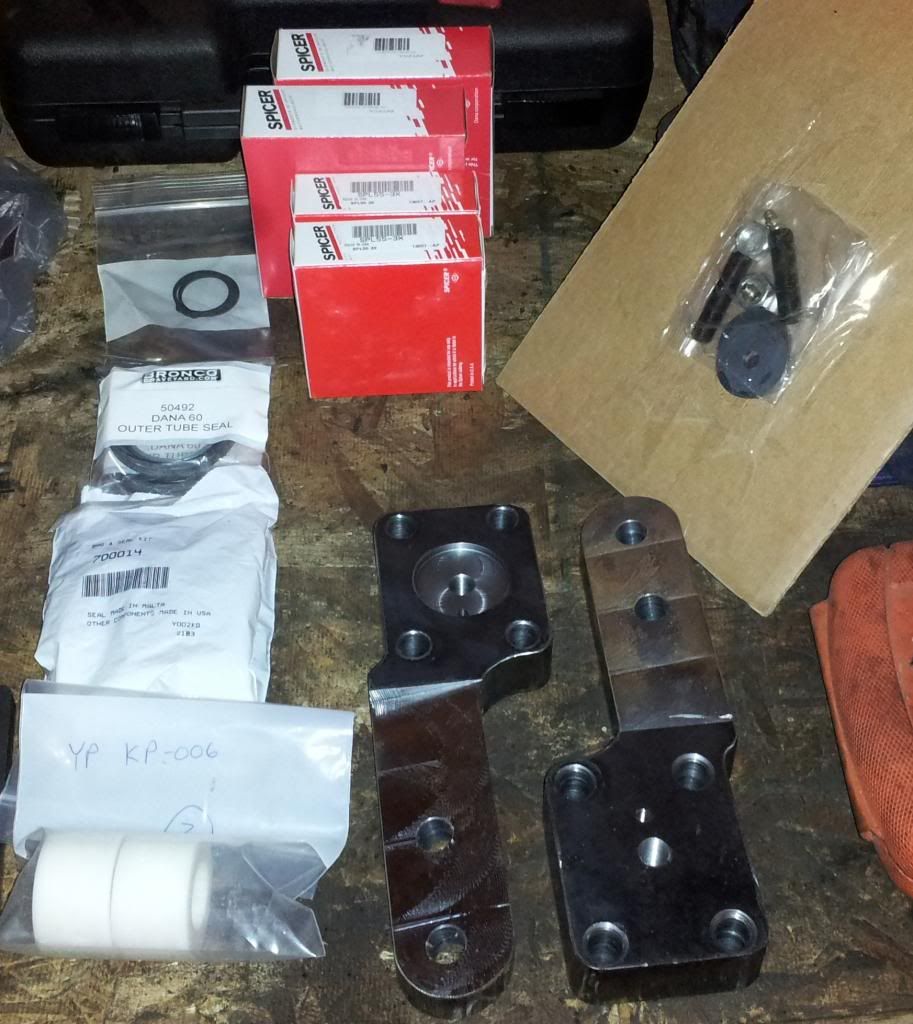 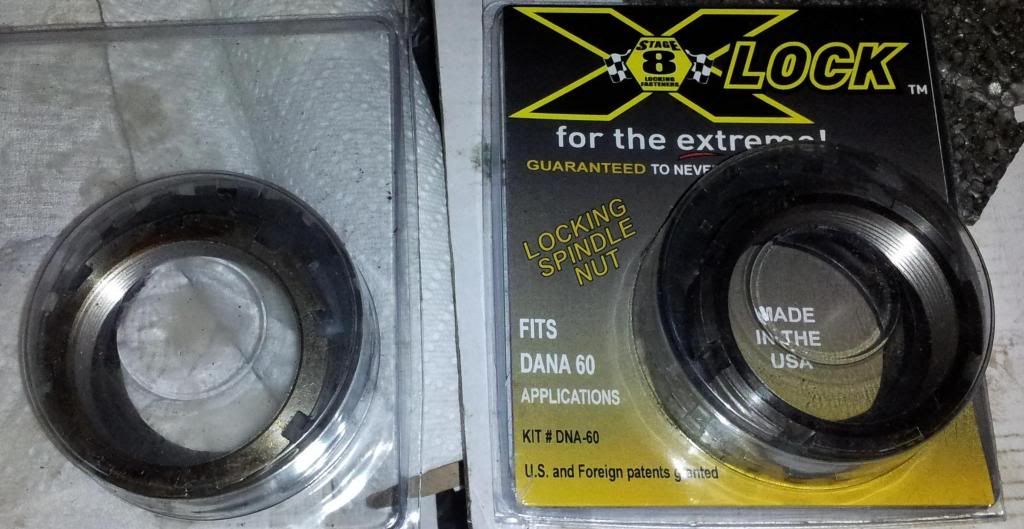 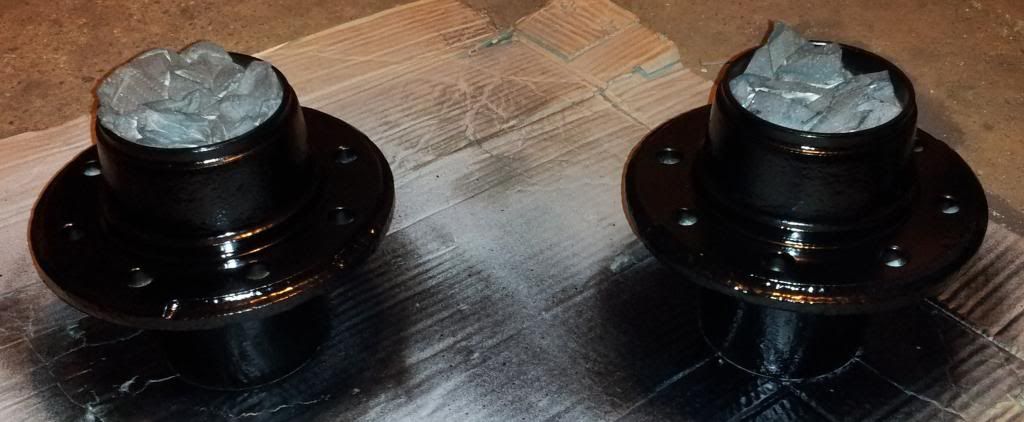
Last edited by BillysGruff; 04-19-2013 at 09:07 AM. |
|
|
|
|
04-21-2013, 07:25 PM
|
#34 |
|
Goats on the Roof!
Join Date: Sep 2012
Posts: 62
|
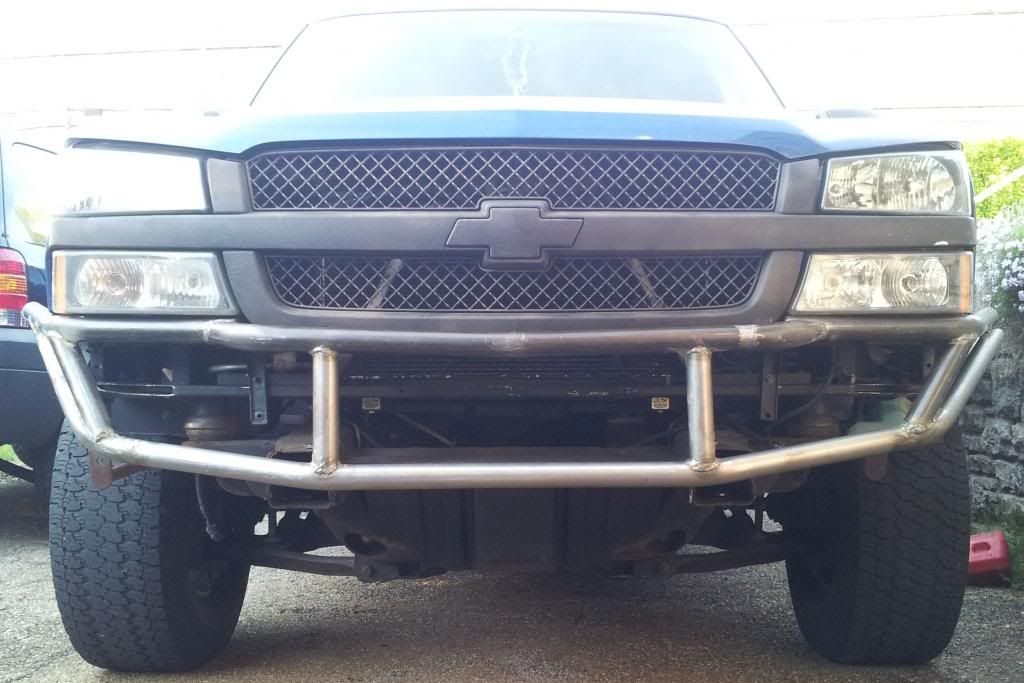
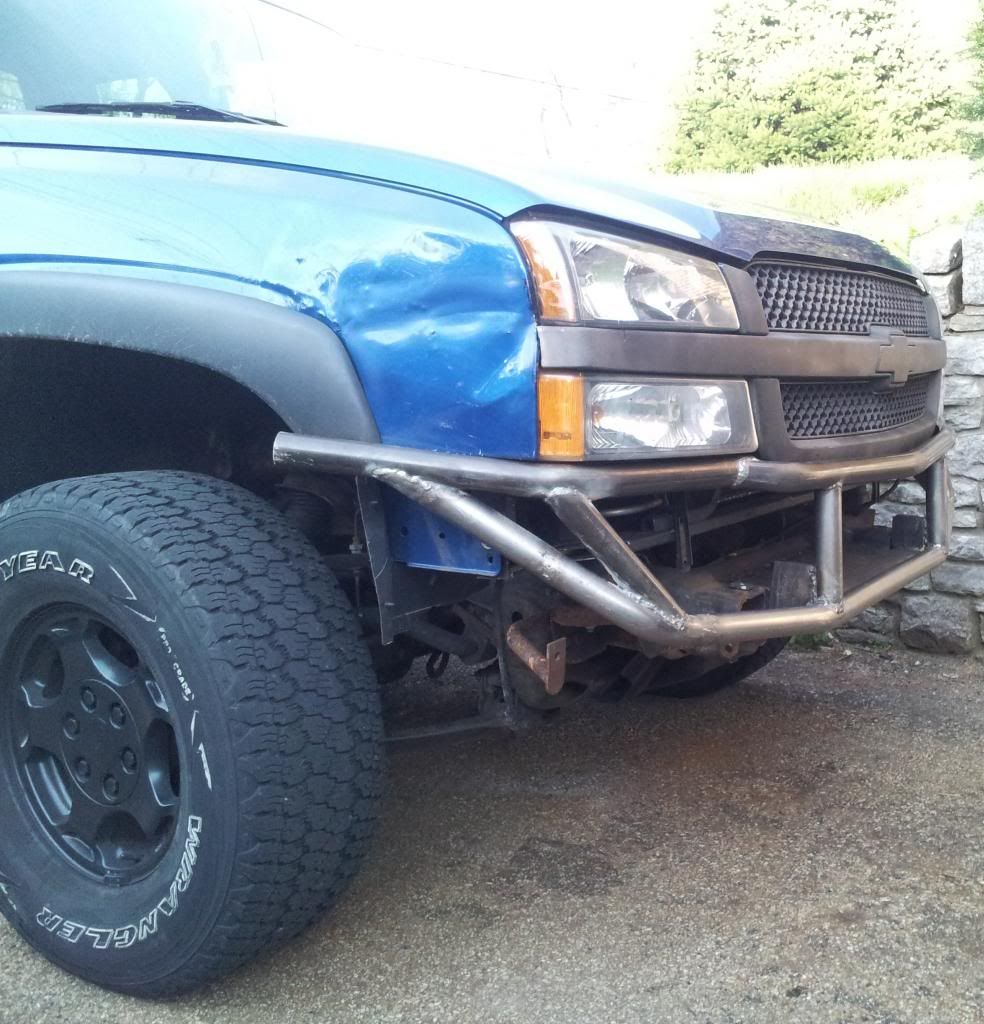
Bumper progress
|
|
|
|
|
04-24-2013, 08:59 AM
|
#35 |
|
Goats on the Roof!
Join Date: Sep 2012
Posts: 62
|
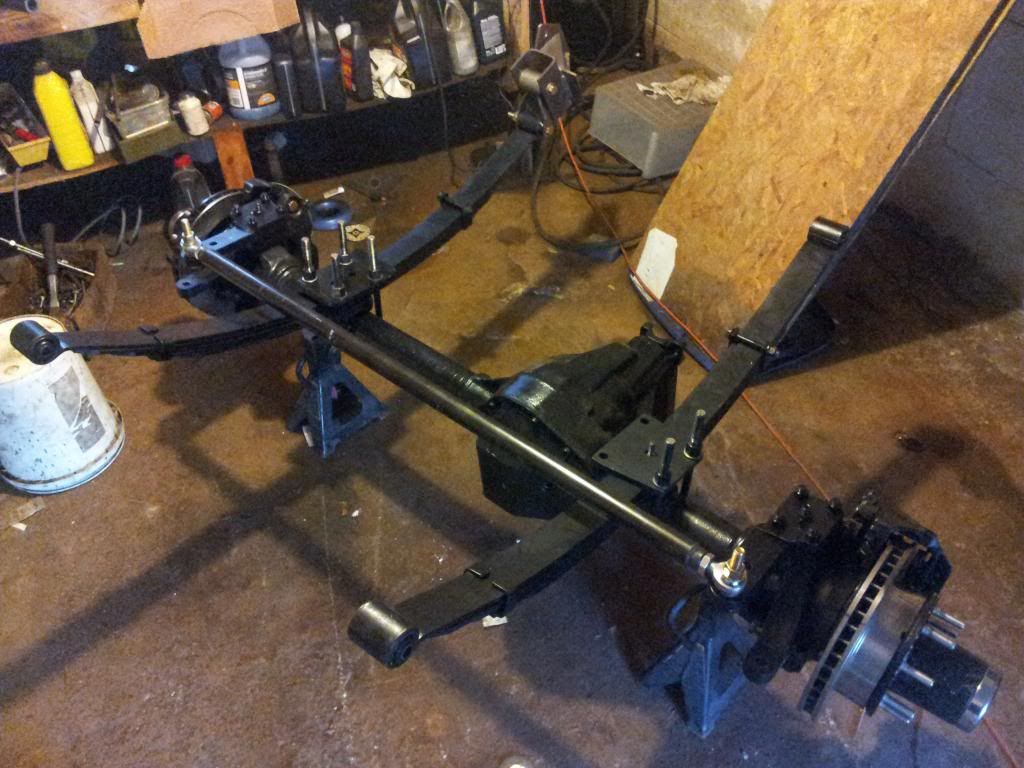
Still alotta work left on the bumper, grinding, flapping, strengthening, and on and on...
Here's what Scott and Rob did for me. I'm freakin stoked! 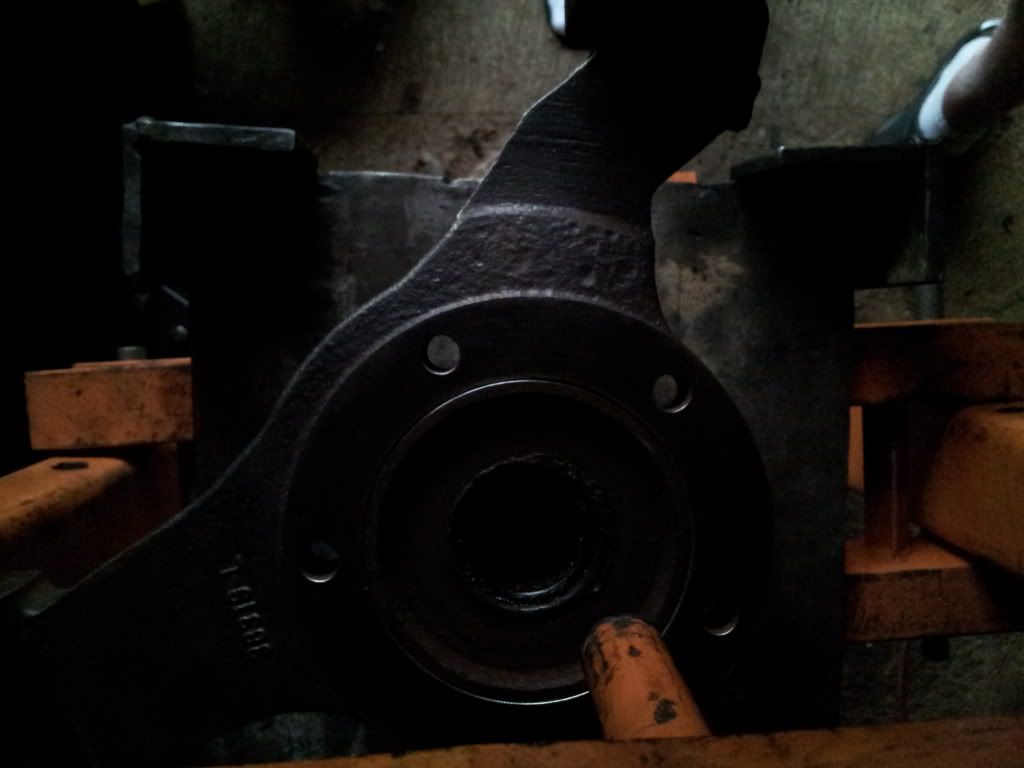 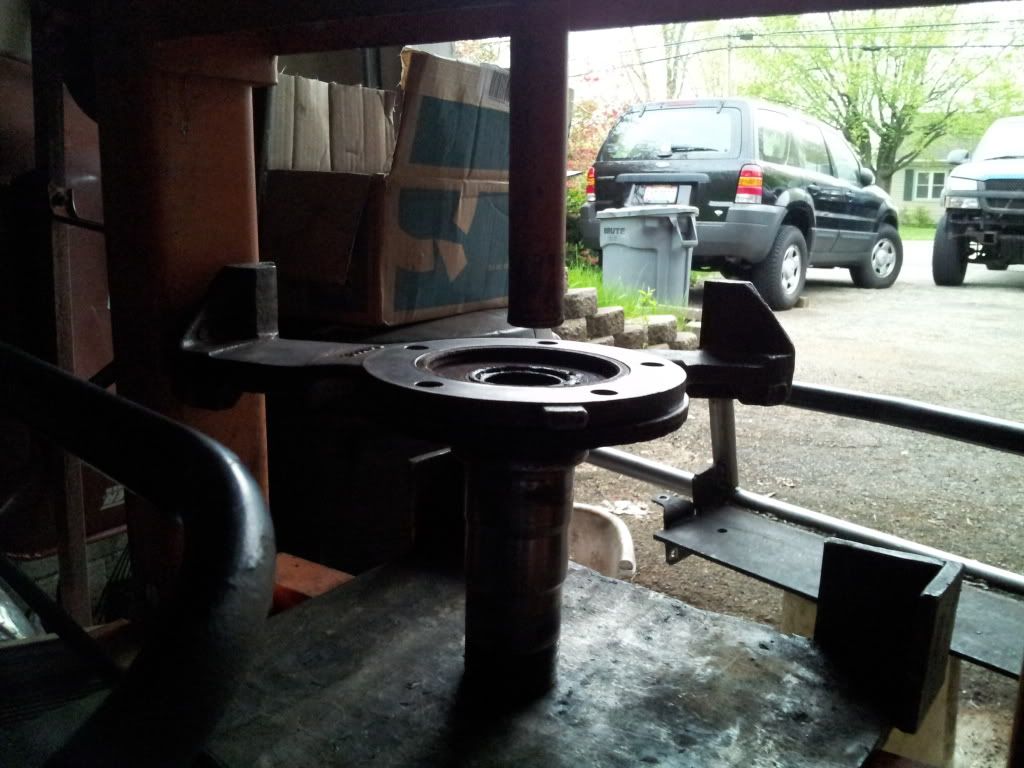 They fit great! |
|
|
|
|
04-25-2013, 08:01 AM
|
#36 |
|
Goats on the Roof!
Join Date: Sep 2012
Posts: 62
|
 I've read that the best way to remove the lower cap is to get it to rotate about the knuckle, and then punch it down.  Issuck, as the daughter would say. (It's stuck.) |
|
|
|
|
04-25-2013, 10:23 AM
|
#37 | |
|
>>>PMC<<<
- CORE Member -
- Administrator -
|
Quote:

|
|
|
|
|
|
04-26-2013, 07:25 AM
|
#38 |
|
Goats on the Roof!
Join Date: Sep 2012
Posts: 62
|
I read that, did something break? Its crazy to think I'm working on something thats 2 years older than I.
|
|
|
|
|
05-09-2013, 01:06 PM
|
#40 | |
|
>>>PMC<<<
- CORE Member -
- Administrator -
|
Quote:
|
|
|
|
|
|
05-09-2013, 01:11 PM
|
#41 | |
|
Goats on the Roof!
Join Date: Sep 2012
Posts: 62
|
Quote:
I'm moving along with suspension parts, and need to take some pics. |
|
|
|
|
|
05-14-2013, 07:02 AM
|
#42 |
|
Goats on the Roof!
Join Date: Sep 2012
Posts: 62
|
Suspension bracketry coming along, only have holes drilled on one side of four from where the shackle will hang. Bits dulled on me.
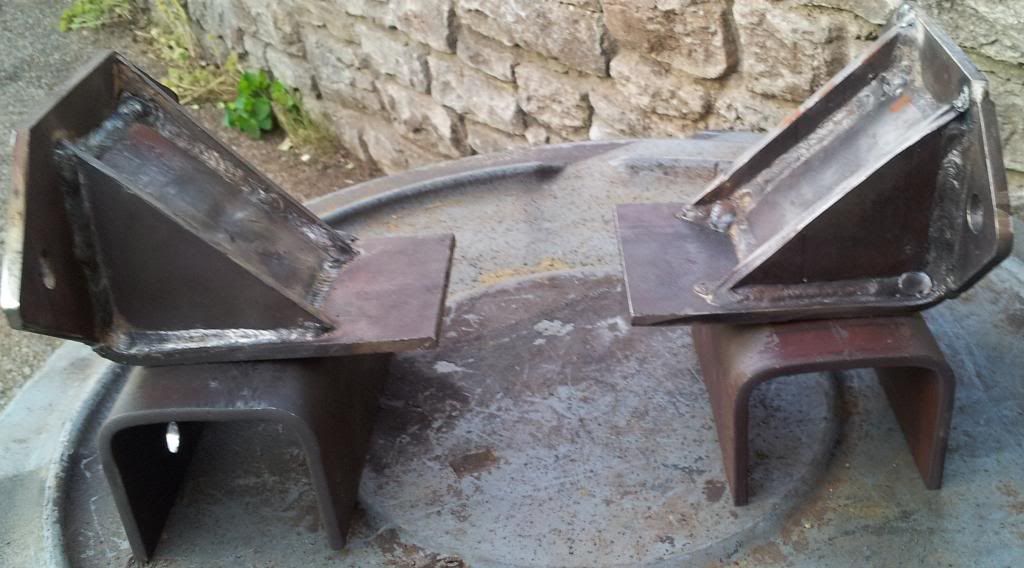 ARP studs that I thought I was supposed to get as a packaged deal from a guy on PBB for the HSA's, but ah well. Also got a Detroit from a good dude here in town. He said the bearings are fairly new, they look good to me so I'm going to run 'em. My guess it that he's a member on here, but I didnt ask for some reason. Said he has a tube buggy and a '79 HPD60 that he switched out for a spool. For $300, its a win for me! I Also have G2 4.88 gears coming, and a good friend in C-bus has a master install kit for me. 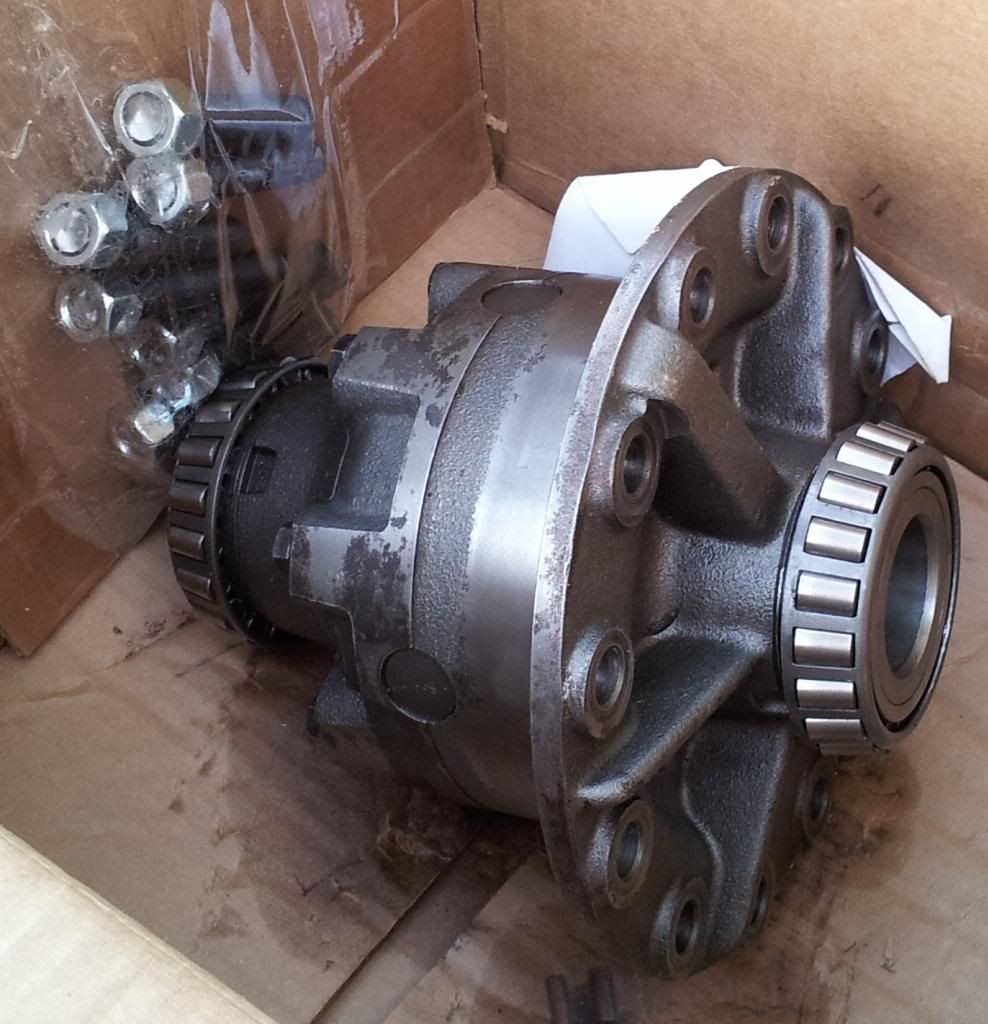 Also, really good bumper progress. I got all the ends capped, fixed the d-side stickingouttoofar issue, and created two gussets on either side (if you will). Next for this is to make the roller fair lead plate and weld that on, then 60 grit flap wheel and paint. 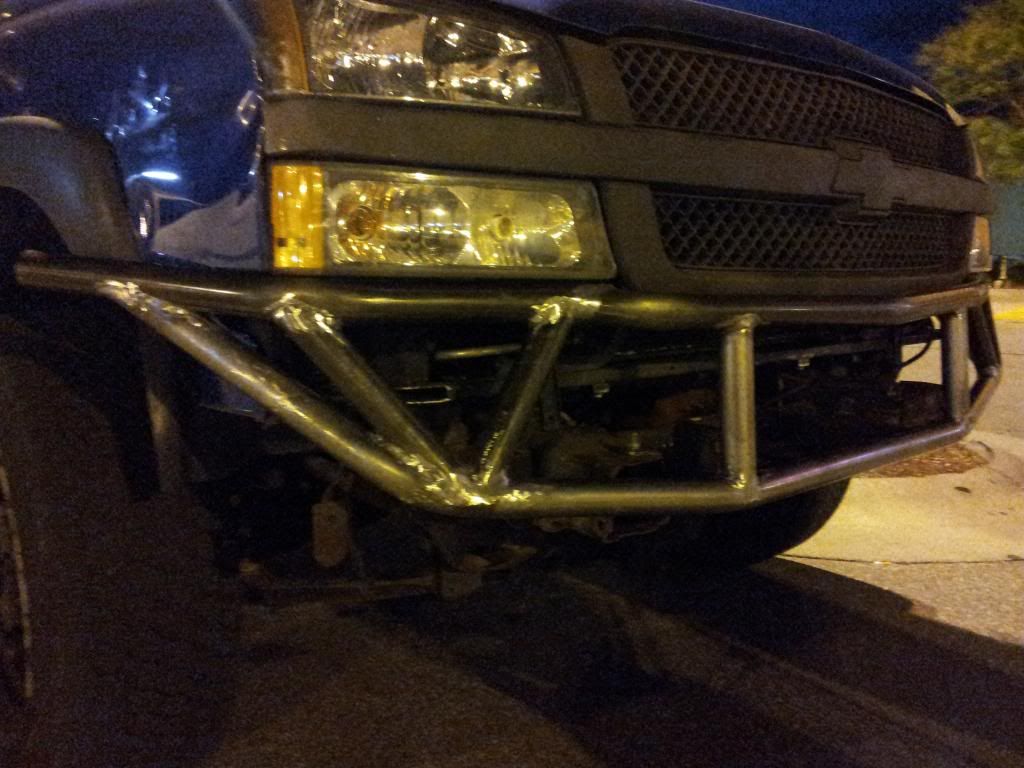 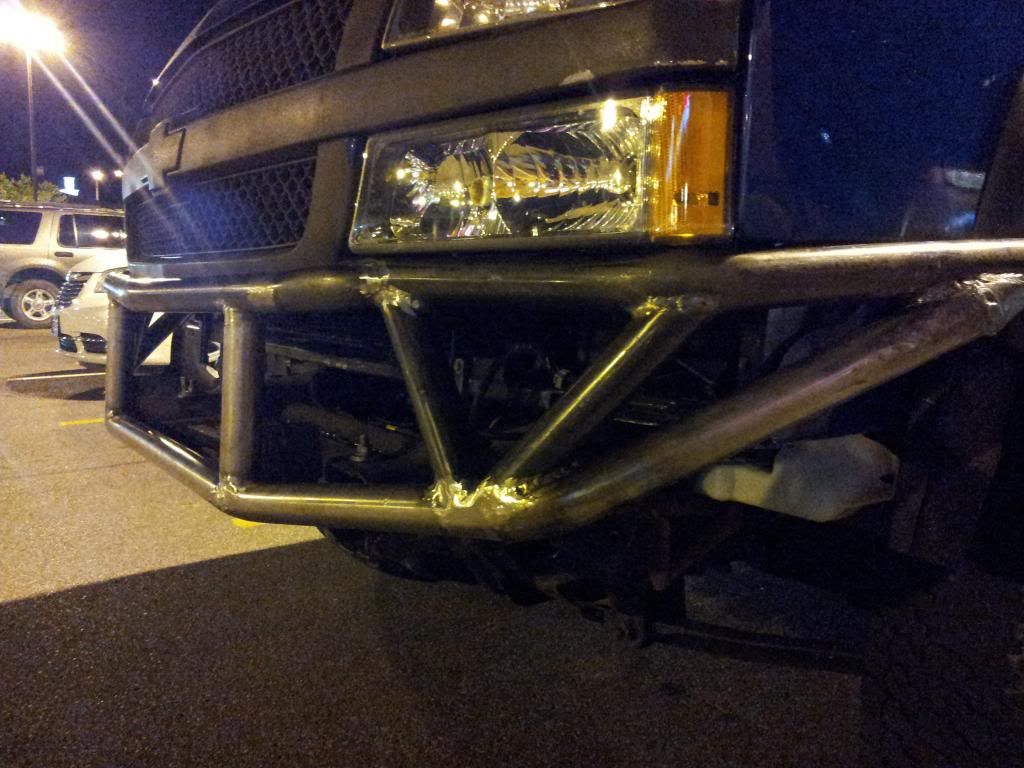
Last edited by BillysGruff; 05-14-2013 at 07:35 AM. |
|
|
|
|
05-14-2013, 07:15 AM
|
#43 |
|
Goats on the Roof!
Join Date: Sep 2012
Posts: 62
|
...
Last edited by BillysGruff; 08-09-2013 at 06:02 PM. |
|
|
|
|
05-31-2013, 11:33 AM
|
#44 |
|
Goats on the Roof!
Join Date: Sep 2012
Posts: 62
|
Just a small update...
I gave myself 2" of overhang with the front x-member and the frame rails. I'm going to weld some vertical pieces such that they sit flush against outside of the frame rails and on the top of the x-member. I'll then drill holes through these plates and rosette weld them on, plus gusset between the x-member and new plate. And I need to get longer hanger and shackles bolts. 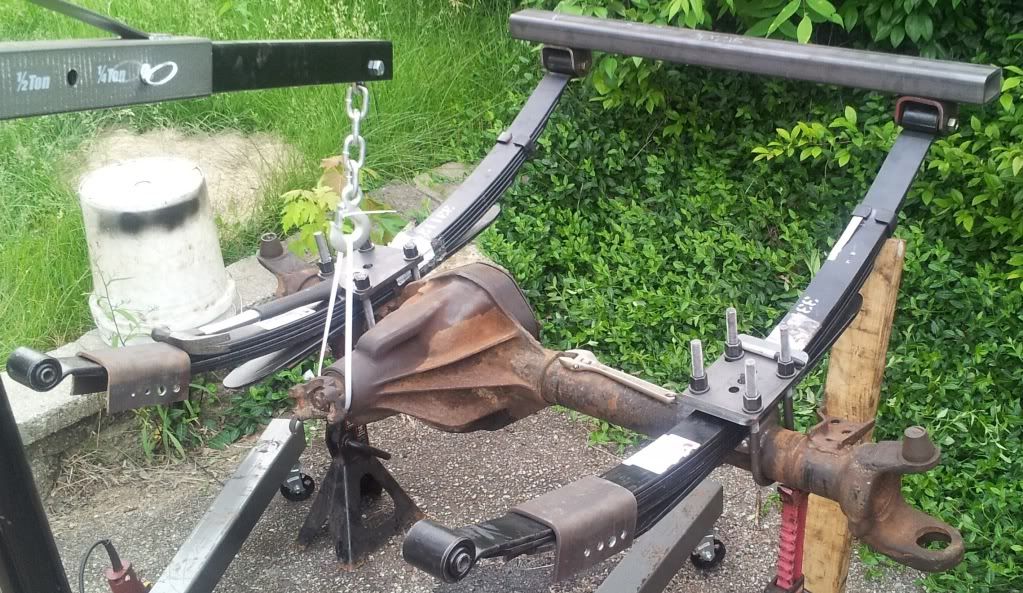
|
|
|
|
|
06-29-2013, 06:38 PM
|
#45 |
|
Goats on the Roof!
Join Date: Sep 2012
Posts: 62
|
Got the gears going. Check out these patterns and stats and let me know what you guys think. These are 4.88's.
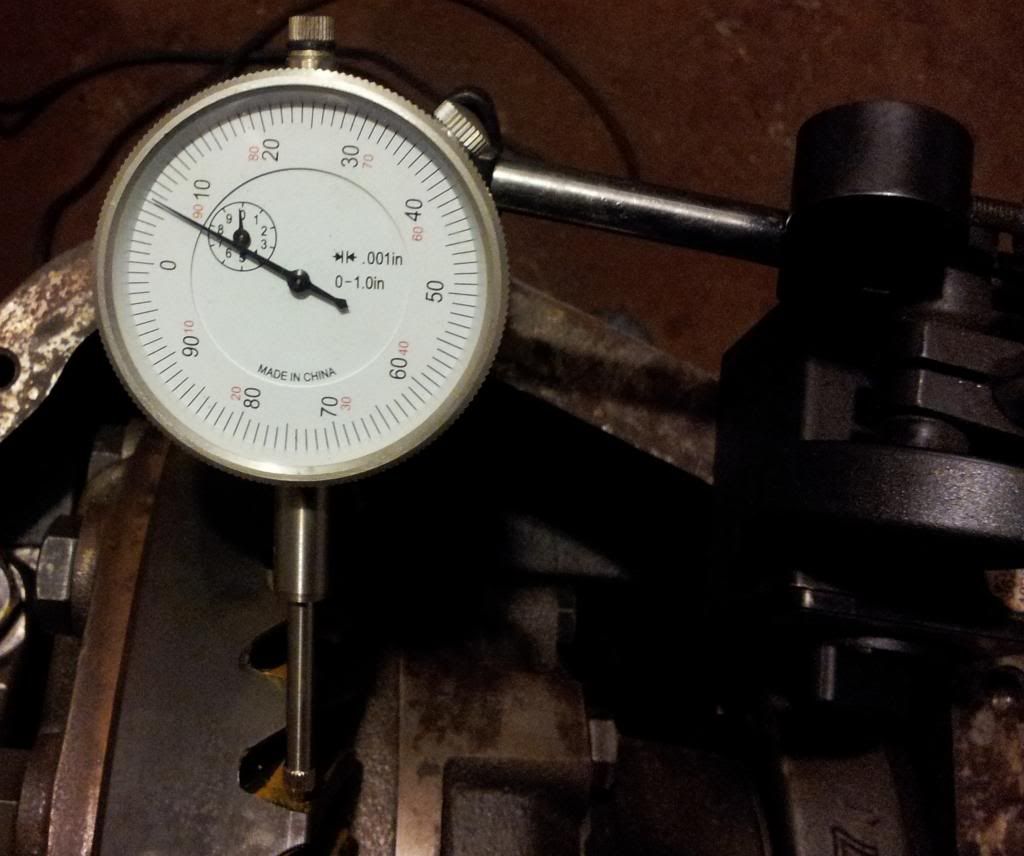
RGS: .056 NRGS: .043 BL: .004, I'll loosen them up a bit, but how much shim should I take out of RGS and add to NRGS? OP: .046 w/~20in/lbs IP: .007 over existing; .015" over existing yields the drive side pattern towards the toe, centered root to flank, and coast side as a centered half moon, meaning it was too much shim. I'll try .012" over next time. Coast: 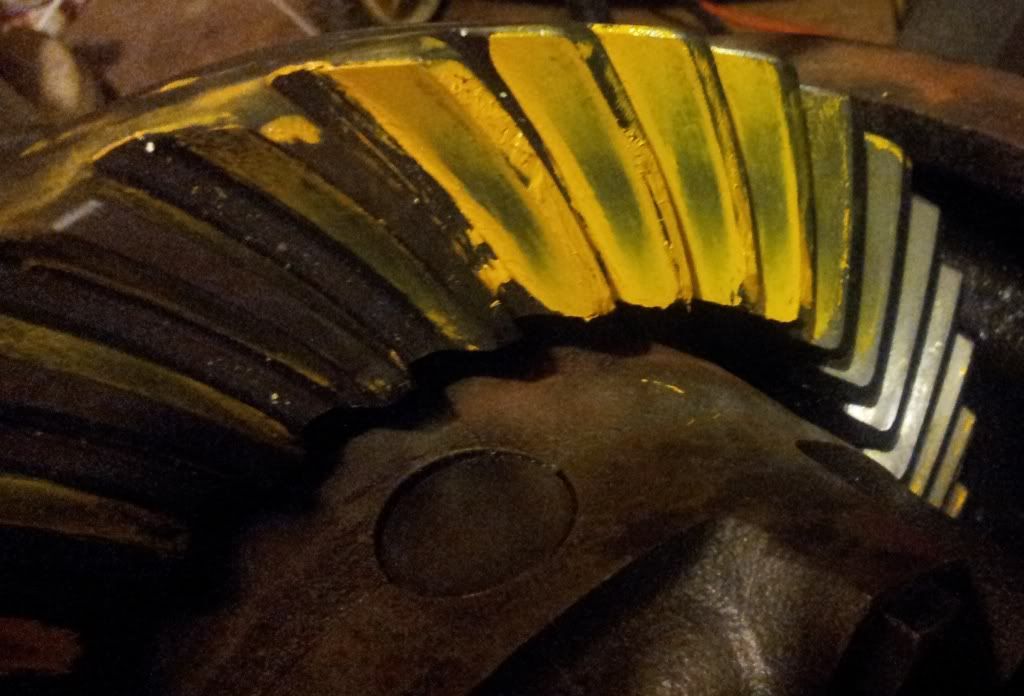 Drive: 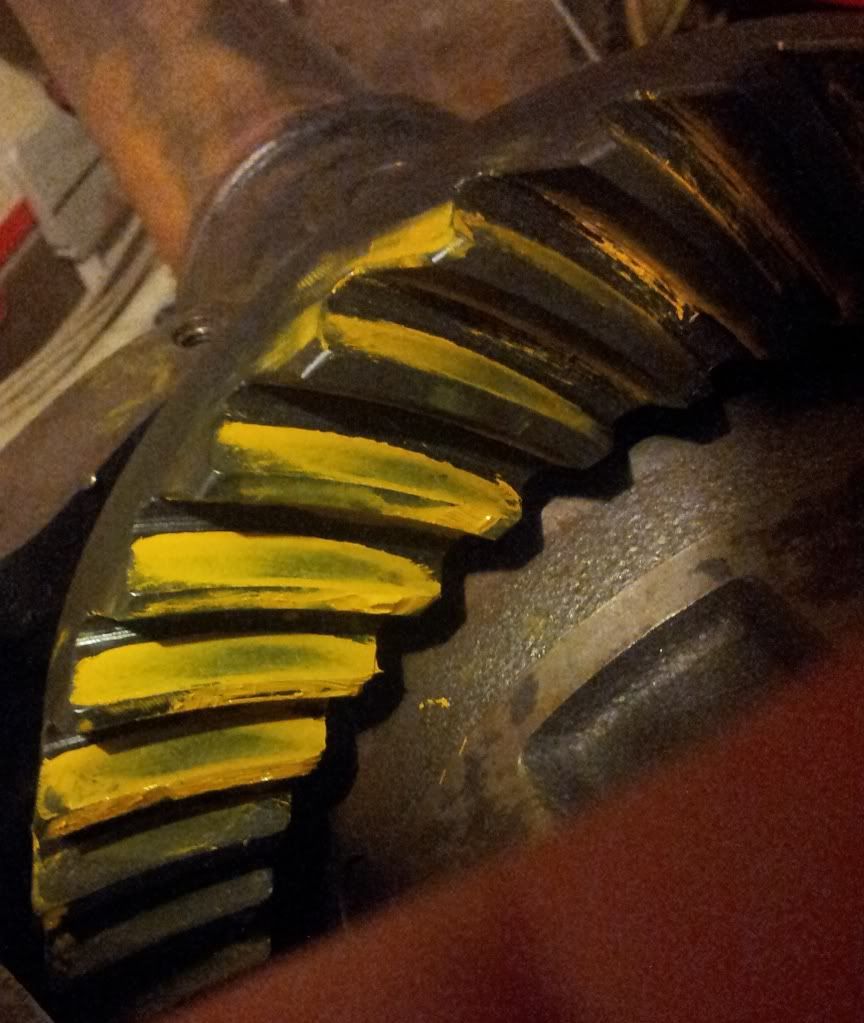 Drive, the last one appears almost rhombus like in shape: 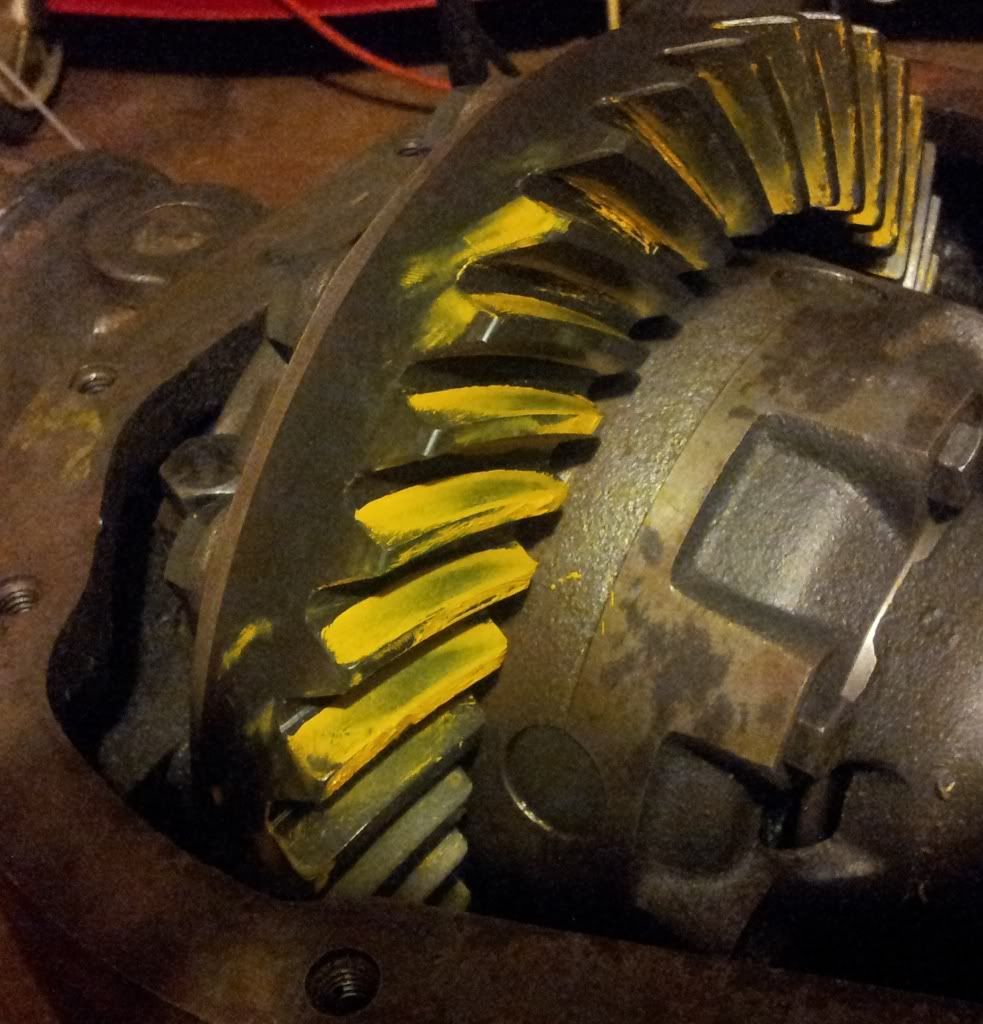
Last edited by BillysGruff; 08-09-2013 at 05:59 PM. |
|
|
|
|
08-10-2013, 05:06 PM
|
#46 |
|
Goats on the Roof!
Join Date: Sep 2012
Posts: 62
|
I think BL is better now. It was in b/t .006 and .007 every place I took a reading. I used BillaVista's method that for every .010" carrier shim change there is .007" BL change, so I settled on .005" shim movement to the NRGS to try get me .0035" more BL.
 Drive side, how do I get rid of the rhombus shape? 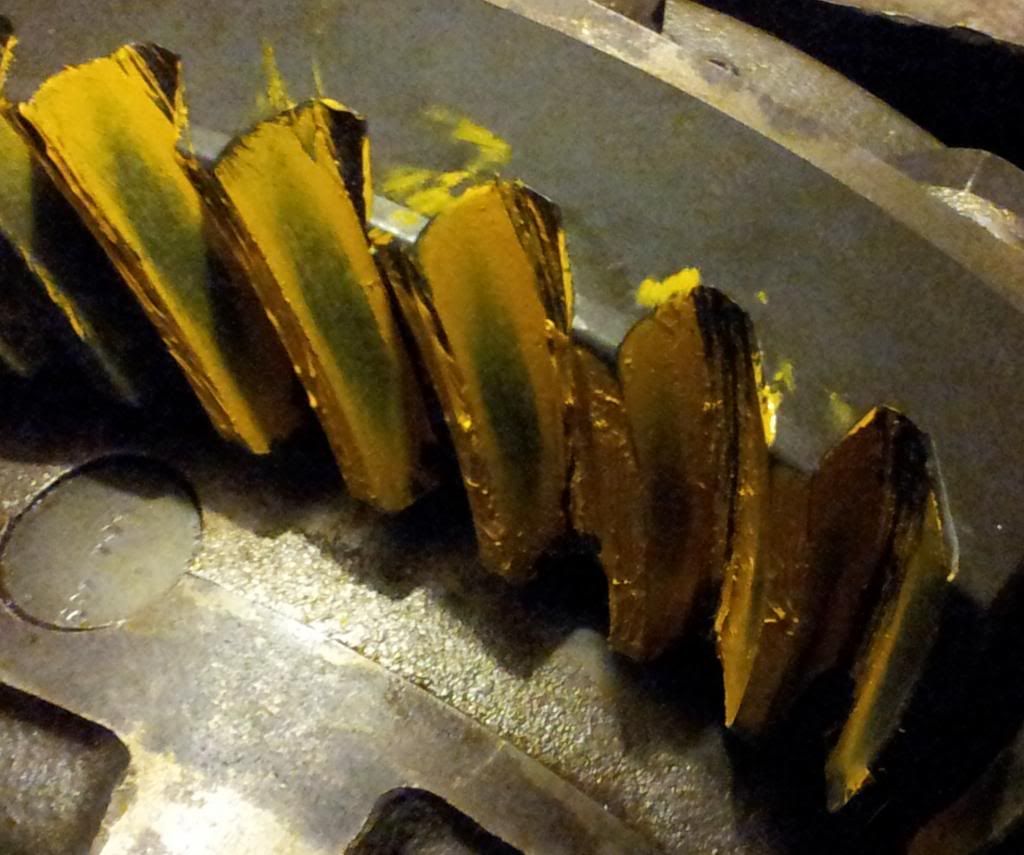 Coast side: 
|
|
|
|
|
08-26-2013, 04:34 PM
|
#47 |
|
Goats on the Roof!
Join Date: Sep 2012
Posts: 62
|
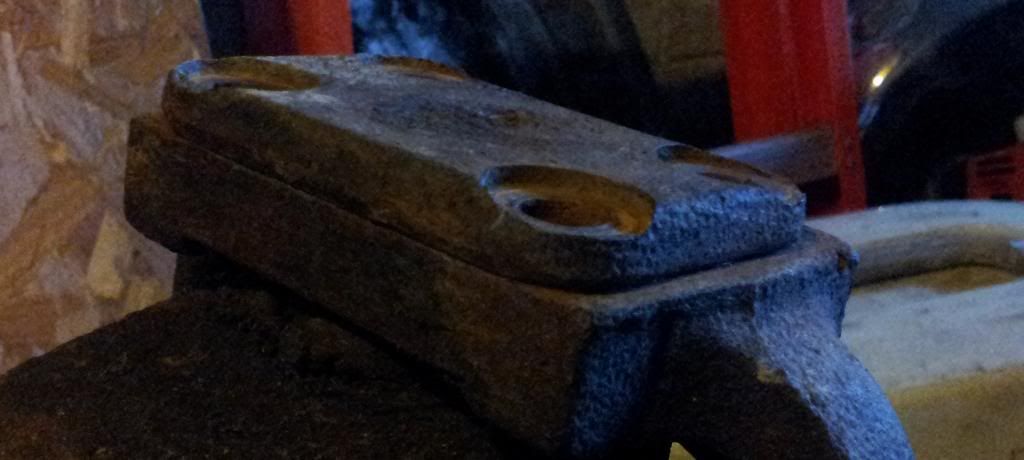
Relief cut in the shoulder, as you all can see they are badly pitted.
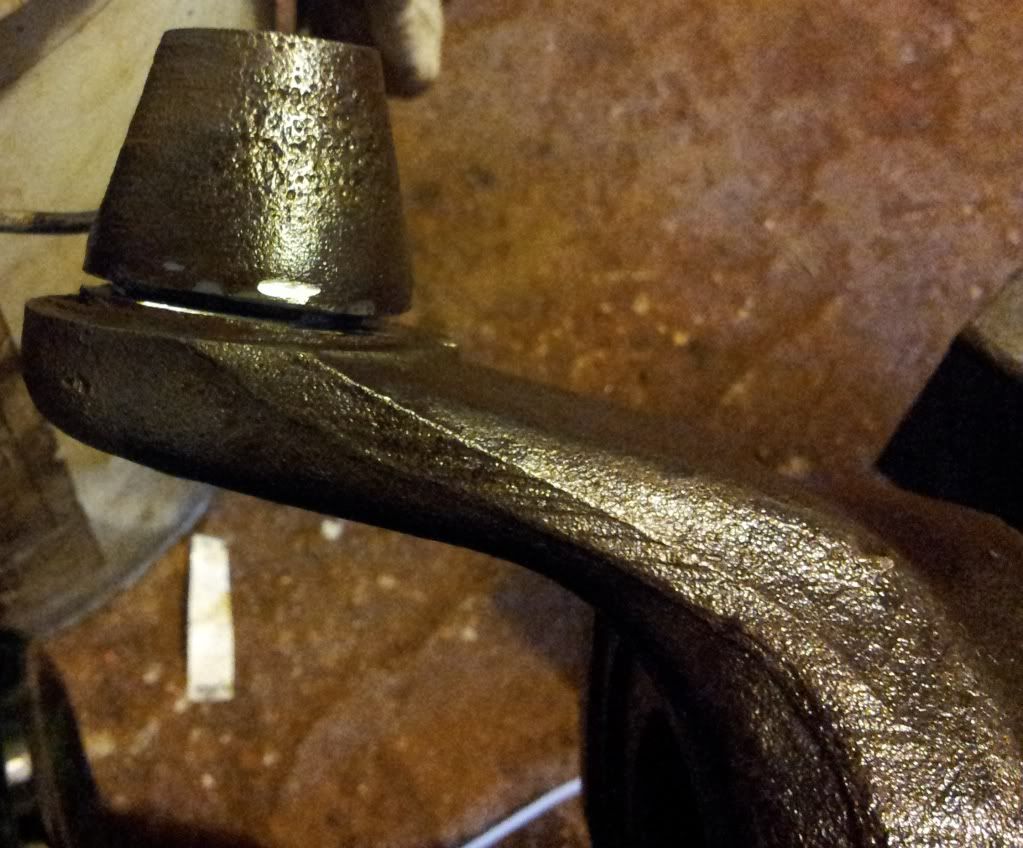 New bearings pressed on to carrier and pinion 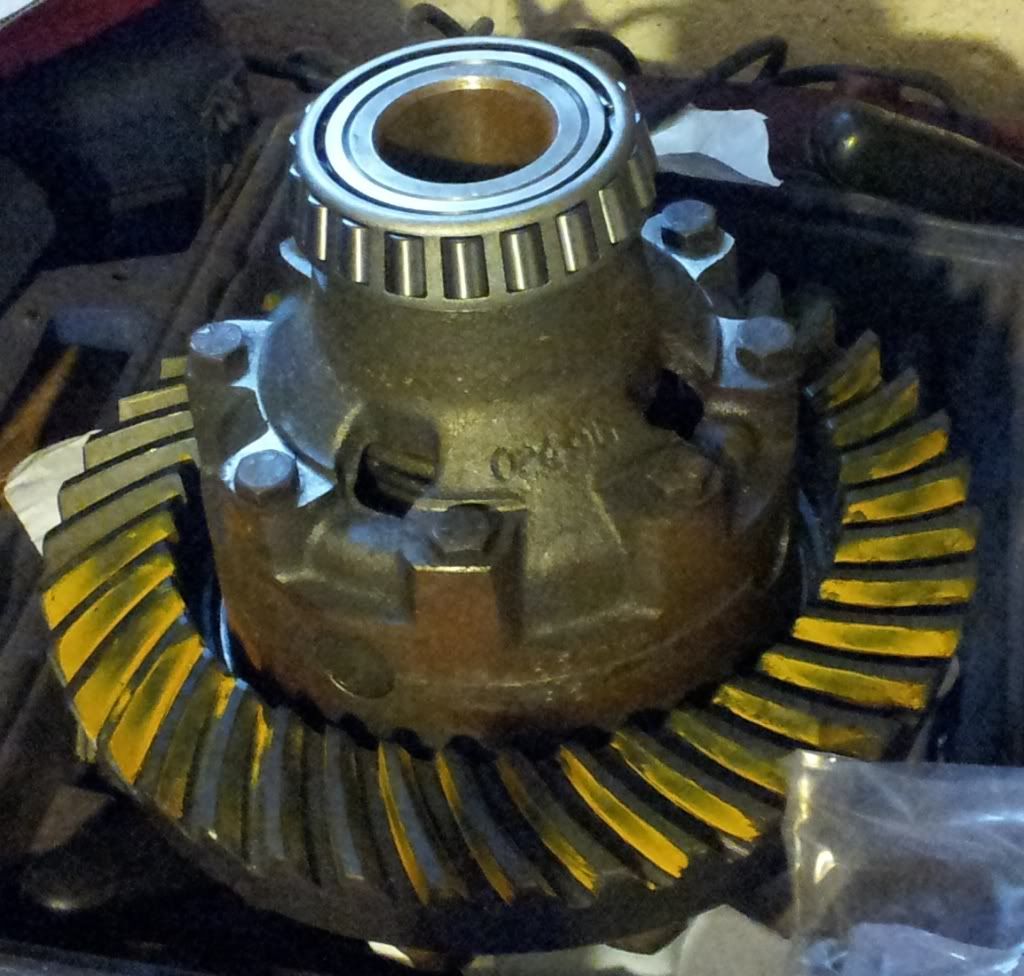 Finally got the housing damn near completely clean 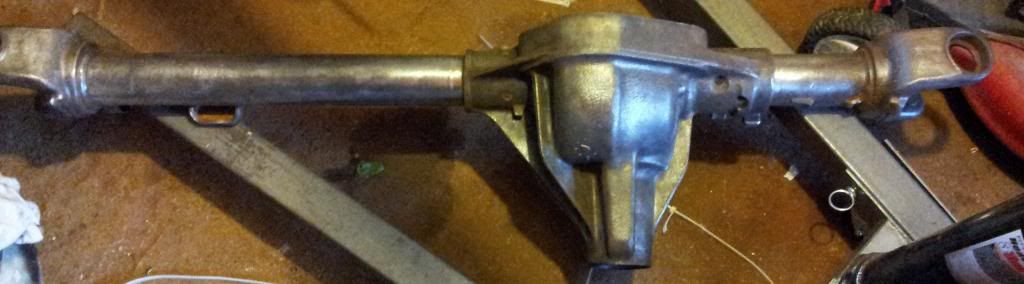 First successful drill and tap, that bit that comes with the set is so much sharper than anything I've ever seen 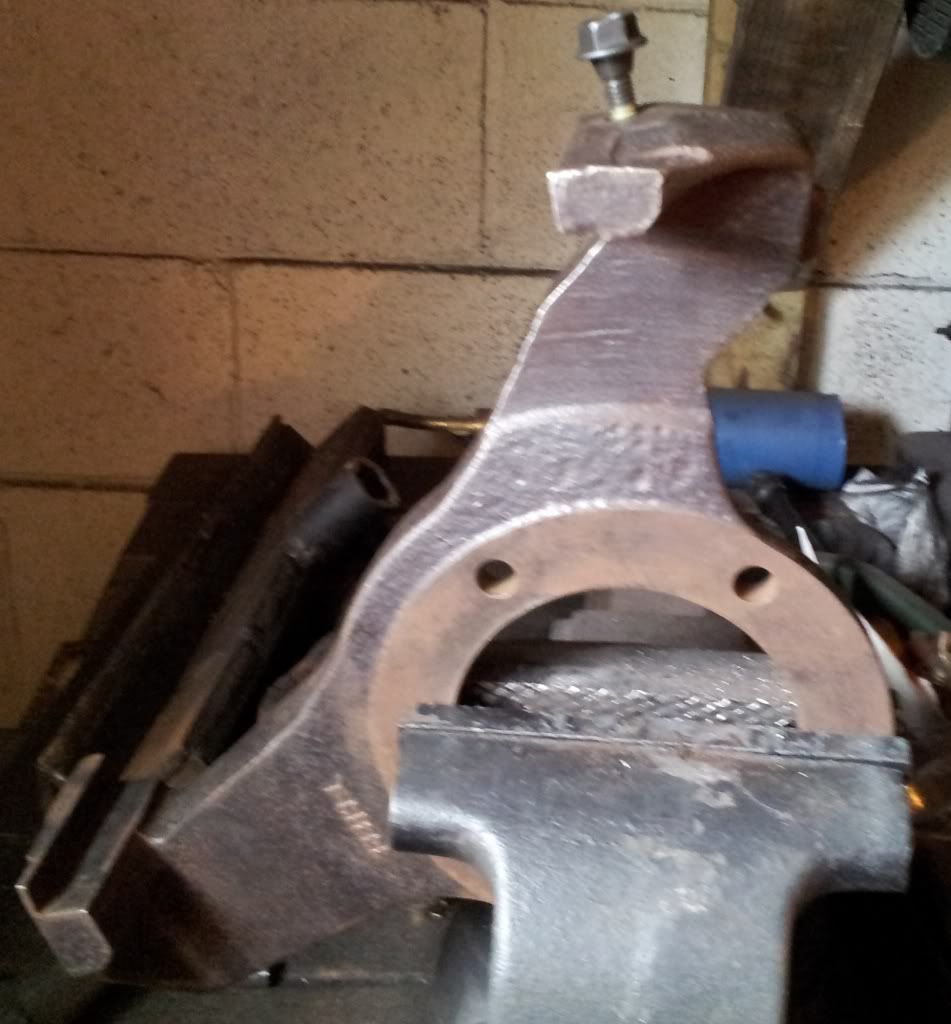 Uuuuuuppppdate time Old kingpins have been removed, slapped down some 250* paint after cleaning 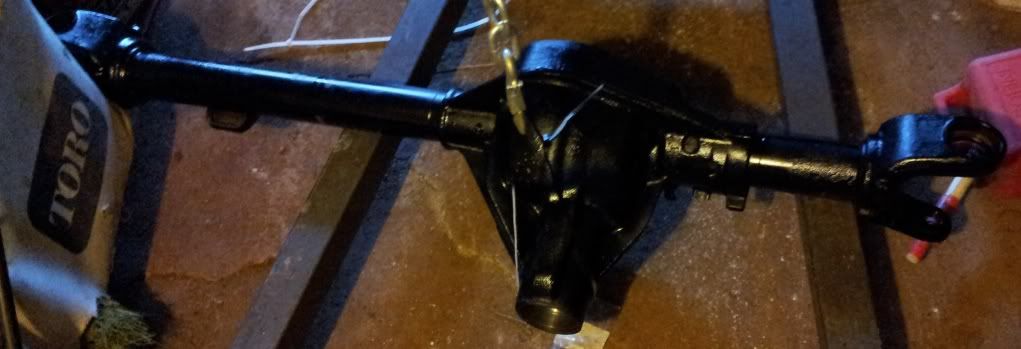 Moose knuckle 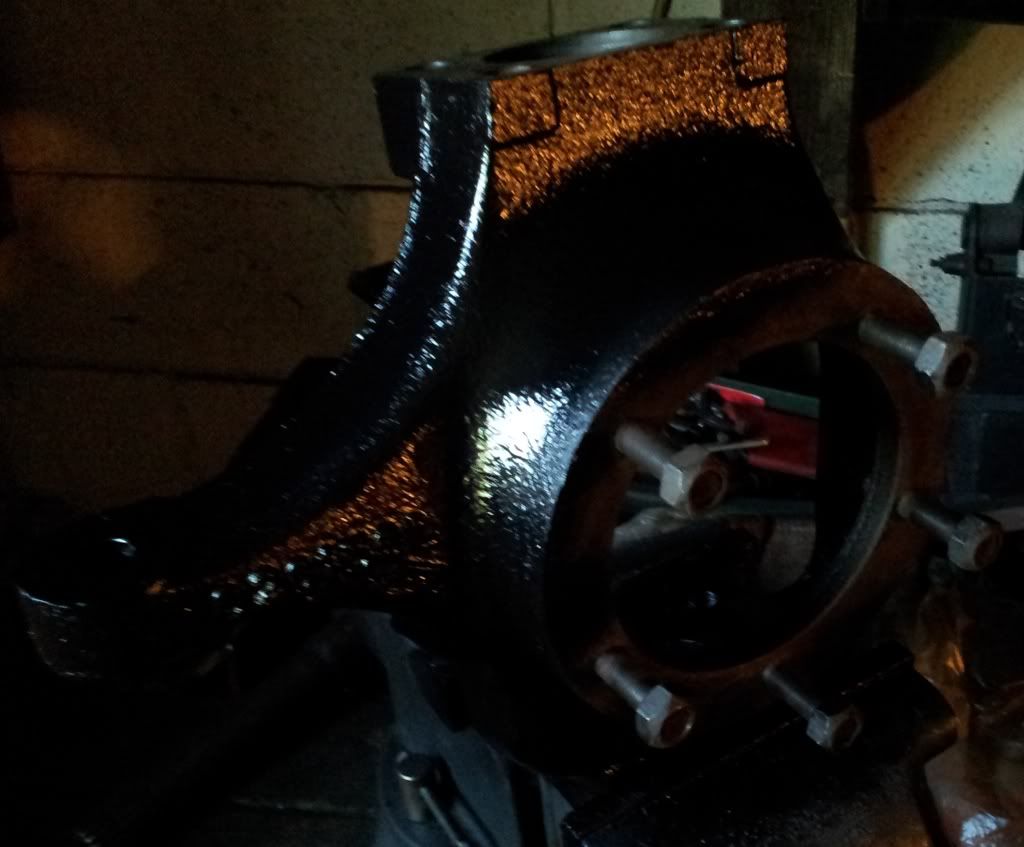 Carnage for Kyle 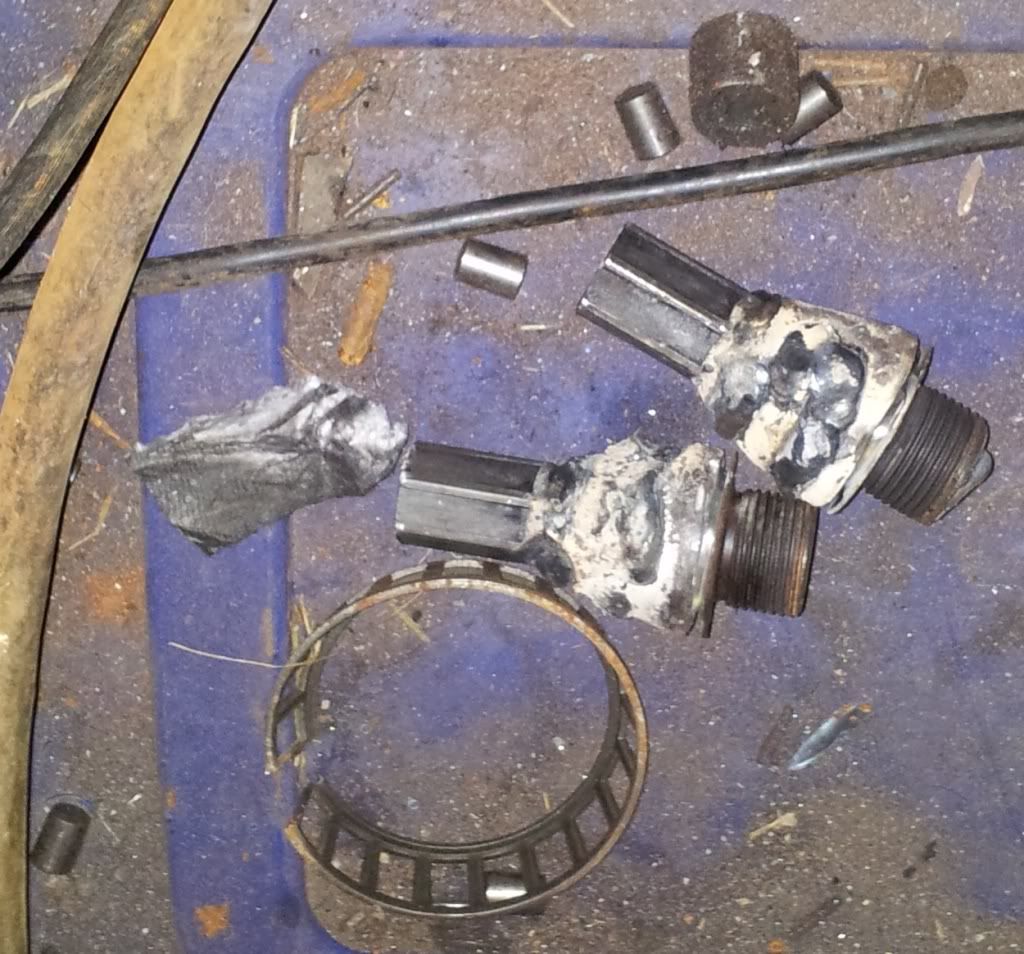
|
|
|
|
|
08-26-2013, 07:33 PM
|
#48 |
|
>>>PMC<<<
- CORE Member -
- Administrator -
|
Looks good.
Hope you have better luck than I did with those conical bolts for the caliper. Mine kept letting the parts fall out. I ended up using a regular bolt instead and tacking a small washer to the bracket. Havn't lost any parts since then. |
|
|
|
|
08-27-2013, 05:54 AM
|
#49 |
|
Goats on the Roof!
Join Date: Sep 2012
Posts: 62
|
Thanks man. It's getting there. I've read that about those bolts. One guy suggested using allen head bolts so they dont stick out as far and its hard to overtorque them. Next I need to get the housing secured down somehow, make up an extension, and torque down the kingpins.
|
|
|
|
|
12-19-2013, 07:10 AM
|
#50 |
|
Goats on the Roof!
Join Date: Sep 2012
Posts: 62
|
A small update, actually been working like crazy on this thing. BTF diff cover welded, spring clamps made, made new shackles, modified the hangers for better clearance, hubs all assembled, springs painted/removed overload, brakes installed..
 Then this happened...I think I welded it too hot and warped the bung  Also working on some double shear steering 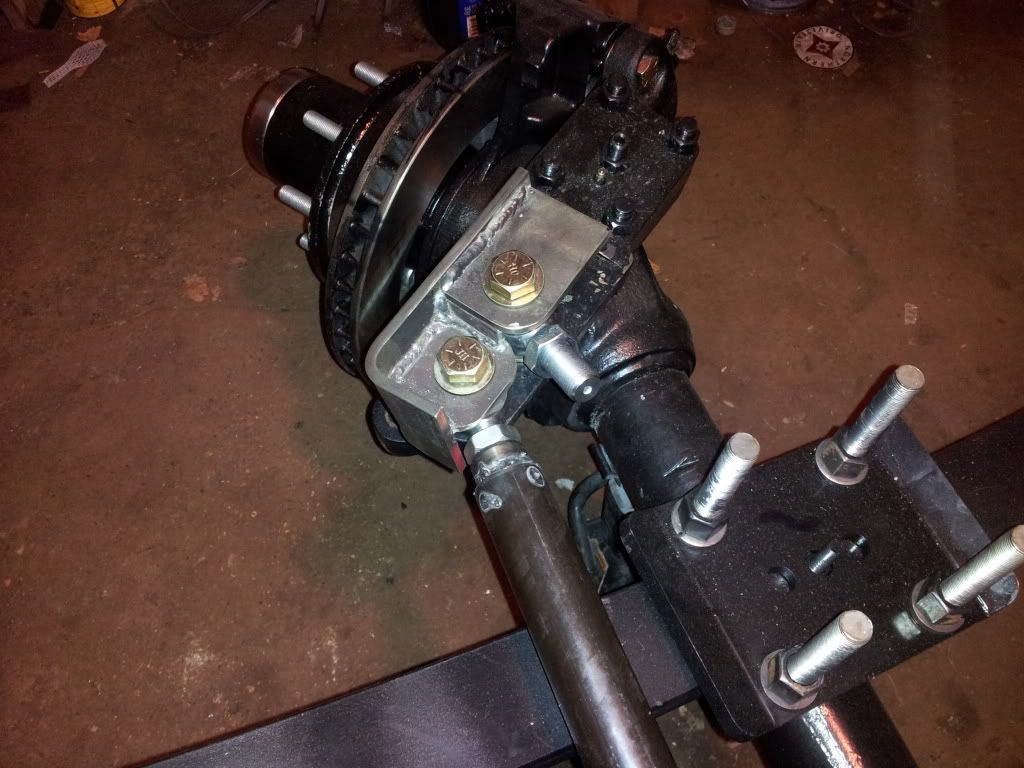 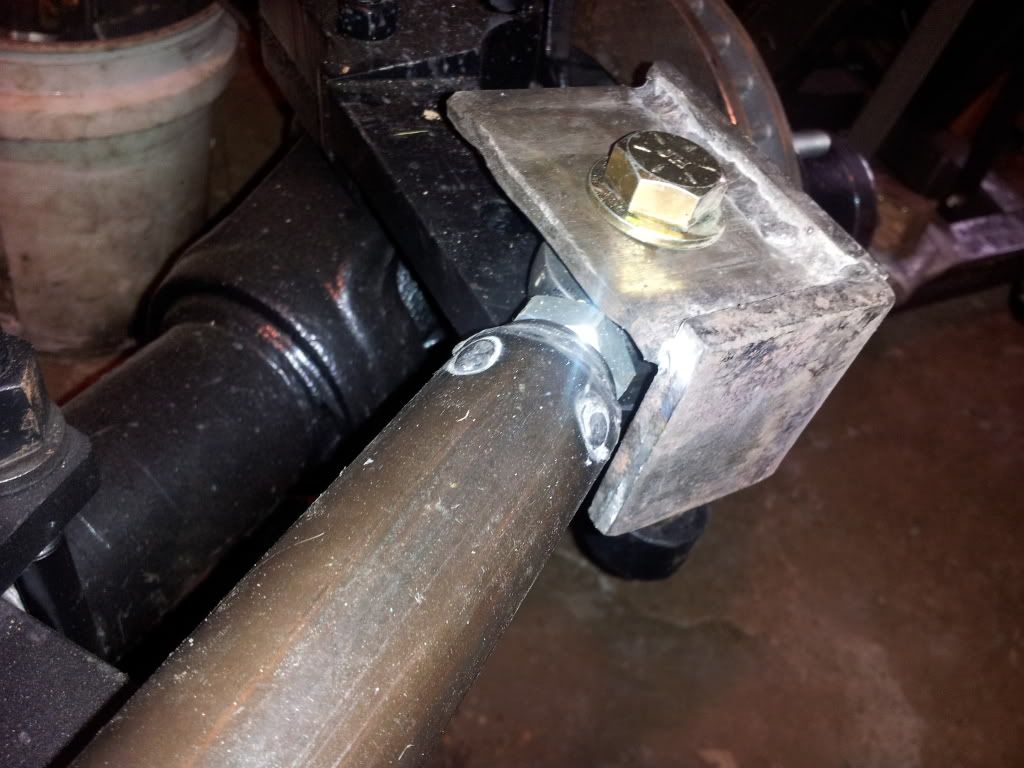
|
|
|
|
 |
|
|


 Linear Mode

